Sunday, April 26, 2020
$$$ Bug Bounty $$$
What is Bug Bounty ?

A bug bounty program, also called a vulnerability rewards program (VRP), is a crowdsourcing initiative that rewards individuals for discovering and reporting software bugs. Bug bounty programs are often initiated to supplement internal code audits and penetration tests as part of an organization's vulnerability management strategy.
Many software vendors and websites run bug bounty programs, paying out cash rewards to software security researchers and white hat hackers who report software vulnerabilities that have the potential to be exploited. Bug reports must document enough information for for the organization offering the bounty to be able to reproduce the vulnerability. Typically, payment amounts are commensurate with the size of the organization, the difficulty in hacking the system and how much impact on users a bug might have.
Mozilla paid out a $3,000 flat rate bounty for bugs that fit its criteria, while Facebook has given out as much as $20,000 for a single bug report. Google paid Chrome operating system bug reporters a combined $700,000 in 2012 and Microsoft paid UK researcher James Forshaw $100,000 for an attack vulnerability in Windows 8.1. In 2016, Apple announced rewards that max out at $200,000 for a flaw in the iOS secure boot firmware components and up to $50,000 for execution of arbitrary code with kernel privileges or unauthorized iCloud access.
While the use of ethical hackers to find bugs can be very effective, such programs can also be controversial. To limit potential risk, some organizations are offering closed bug bounty programs that require an invitation. Apple, for example, has limited bug bounty participation to few dozen researchers.
Related posts
Hacking All The Cars - Part 1
A step by step lab based mini course on analyzing your car network
I wanted to learn about hacking cars. As usual I searched around the internet and didn't find any comprehensive resources on how to do this, just bits and pieces of the same info over and over which is frustrating. I am not a car hacking expert, I just like to hack stuff. This mini course will run in a fully simulated lab environment available from open garages, which means in 5 minutes from now you can follow along and hack cars without ever bricking your girlfriends car. Since you obviously wouldn't attack your own Lambo, totally use your girlfriends Prius.
Below are the topics covered in this blog series so you can decide if you want to read further:
Whats covered in this car hacking mini course:
Setting up Virtual Environments for testing
Sniffing CAN Traffic
Parsing CAN Traffic
Reverse Engineering CAN IDs
Denial of service attacks
Replaying/Injecting Traffic
Coding your own CAN Socket Tools in python
Targeted attacks against your cars components
Transitioning this to attacking a real car with hardware
The first thing we are going to do before we get into any car hacking specifics such as "WTF is CAN?", is get your lab up and running. We are going to run a simple simulated CAN Bus network which controls various features of your simulated car. Its better to learn by doing then sit here and recite a bunch of car network lingo at you and hope you remember it.
I also don't want you to buy a bunch of hardware and jack into your real car right away. Instead there are options that can get you started hacking cars RIGHT NOW by following along with this tutorial. This will also serve to take away the fear of hacking your actual car by understanding what your doing first.
Video Playlist:
Setting up your Lab:
First things first, set yourself up with an Ubuntu VMware install, and load it up. Optionally you could use a Kali Iinux VM, however, that thing drives me nuts with copy paste issues and I think Kayak was giving me install problems. So support is on you if you would like to use Kali. However, I do know Kali will work fine with OpenGarages virtual car.. So feel free to use it for that if you have it handy and want to get started right away.
Install PreReq Libraries:
Once you load this up you are going to want to install CAN utilities and pre-requisite libraries. This is really easy to do with the following Apt-get commands:
sudo apt-get update
sudo apt-get install libsdl2-dev libsdl2-image-dev can-utils
Then we are going to pull down the ICSimulator repo:
git clone https://github.com/zombieCraig/ICSim.git
Starting the simulator:
Once this is done we can startup the simulator by changing directories to the downloaded repo and running the following 2 commands, which will setup a virtual CAN interface and a simulator GUI Cluster:
Run the setup Script to get the vcan0 interface up:
root@kali:~/ICSim# ./setup_vcan.sh
root@kali:~/ICSim# ./icsim vcan0
On a new terminal tab we will open up our simulators controller with the following command,
root@kali:~/ICSim#./controls vcan0
Note: that the controller must be the in-focus GUI screen to send keyboard commands to the simulator.


How to Use the Simulator:
The simulator has a speedometer with Right and Left turn signals, doors etc. Below are the list of commands to control the simulator when the Control panel is in focus. Give them each a try and note the changes to the simulator.
Up and Down keys control the gauges clusters speedometer
Left and Right keys Control the Blinkers
Right Shift + X, A or B open doors
Left Shift + X, A or be Close doors
Try a few of the above commands for example Right Shift +X and you will see the interface change like so, notice the open door graphic:
Awesome, thanks to OpenGarages you now you have your very own car to hack
Notice in the setup commands above we used a VCan0 interface. Run Ifconfig and you will now see that you indeed have a new network interface that speaks to the CAN network over VCan0.
ficti0n@ubuntu:~/Desktop/ICSim$ ifconfig vcan0
vcan0 Link encap:UNSPEC HWaddr 00-00-00-00-00-00-00-00-00-00-00-00-00-00-00-00
UP RUNNING NOARP MTU:16 Metric:1
RX packets:558904 errors:0 dropped:0 overruns:0 frame:0
TX packets:558904 errors:0 dropped:0 overruns:0 carrier:0
collisions:0 txqueuelen:1
RX bytes:3663935 (3.6 MB) TX bytes:3663935 (3.6 MB)
Car networks run on a variety of protocols most prevalent being CAN. You can think of a CAN Bus like an old school networking hub where everyone can see everyone elses traffic. This is true to some extent although you may not see all of the cars traffic if its not connected to that particular bus your plugged into. You can think of CAN traffic kind of like UDP in that its send and forget, the main difference being parts of the CAN bus network don't actually have addresses and everything runs off arbitration IDs and priorities. Thats enough background to get you doing rather then reading.
With a little knowledge out of the way lets check if we can see our CAN traffic from our virtual car via the CanDump utility, which you installed as part of CanUtils package above. Using the following command on the vcan0 interface our simulator uses you can view a stream of traffic:
With a little knowledge out of the way lets check if we can see our CAN traffic from our virtual car via the CanDump utility, which you installed as part of CanUtils package above. Using the following command on the vcan0 interface our simulator uses you can view a stream of traffic:
ficti0n@ubuntu:~/Desktop/ICSim$ candump vcan0

Above we can see a bunch of CAN frames, and if we perform actions on the vehicle we will see changes to data values in the CanDump output. However this may happen very fast, and we may not be able to see if for example we unlocked our simulators door. This is because things are changing constantly in the cars IDLE state. One single value changing may not stand out enough for us to take notice or may scroll so fast we cant see it.
Capture and Replay CAN Actions:
One option would be to perform an action and replay it, we should see the actions happen again in the replay if the traffic for the action we recorded is on the same bus network our device is plugged into. There are loads of networks within a car and its not guaranteed our network tap for example an OBD2 port plugin is connected to the same network as door we opened. Or the door may not be connected to the network at all depending on your car and its age or how its configured.
Replaying dumps with CanPlayer:
Another useful tool included with CanUtils package is CanPlayer for replaying traffic. If the functionality we are trying to capture is on the same Bus as the adaptor plugged into the car, or in this case our Virtual CAN interface, we can use CanDump to save traffic to a file. We then use CanPlayer to replay the traffic on the network. For example lets run CanDump and open a door and then replay the functionality with CanPlayer.
Lab 1 Steps:
- Run CanDump
- Right Shift + X to open a door
- Cancel CanDump (ctrl+c)
- Left Shift + X to close the door
- Run can player with the saved dump and it will replay the traffic and open the door
Recording the door opening: (-l for logging)
ficti0n@ubuntu:~/Desktop/ICSim$ candump -l vcan0
Replaying the CanDump file: (use the file your can dump created)
ficti0n@ubuntu:~/Desktop/ICSim$ canplayer -I candump-2018-04-06_154441.log
Nice, so if all went well you should see that your door is now open again. If this did not happen when attacking a real car, just try to replay it again. CAN networks are not like TCP/IP, they are more like UDP in that you send out your request and its not expecting a response. So if it gets lost then it gets lost and you have to resend. Perhaps something with higher priority on the network was sending at the time of your replay and your traffic was overshadowed by it.

Interacting with the Can Bus and Reversing Traffic:
So thats cool, but what about actually understanding what is going on with this traffic, CanDump is not very useful for this, is scrolls by to quickly for us to learn much from. Instead we can use CanSniffer with colorized output to show us the bytes within packets that change. Below is an example of CanSniffer Traffic:
To startup can sniffer run the following:
ficti0n@ubuntu:~/Desktop/ICSim$ cansniffer -c vcan0

You will see 3 fields, Time, ID and Data. Its pretty easy to figure out what these are based on thier name. The most important part for our usage in this blog are the ID and the Data fields.
The ID field is the frame ID which is loosely associated with the device on the network which is effected by the frame being sent. The ID to also determines the priority of the frame on the network. The lower the number of the CAN-ID the higher priority it has on the network and more likely it will be handled first. The data field is the data being sent to change some parameter like unlocking a door or updating output. You will notice that some of the bytes are highlighted RED. The values in red are the values that are changing during the idle state you are currently in.
The ID field is the frame ID which is loosely associated with the device on the network which is effected by the frame being sent. The ID to also determines the priority of the frame on the network. The lower the number of the CAN-ID the higher priority it has on the network and more likely it will be handled first. The data field is the data being sent to change some parameter like unlocking a door or updating output. You will notice that some of the bytes are highlighted RED. The values in red are the values that are changing during the idle state you are currently in.
Determine which ID and Byte controls the throttle:
So with the terminal sniffing window open put the simulator and the controller into the foreground, with the controller being the window you have clicked and selected. Pay attention to the CanSniffer output while hitting the UP ARROW and look for a value that was white but is now Red and increasing in value as the throttle goes up. This might take you a few minutes of paying attention to whats going on to see.
The following 2 pictures show ID 244 in the IDLE state followed by pressing the up button to increase the speed. You will notice a byte has turned red and is increasing in value through a range of HEX values 0-F. It will continue to enumerate through values till it reaches its max speed.


The byte in ID 244 which is changing is the value while the throttle is engaged, so 244 associated in some way with the increasing speed. The throttle speed is a good value to start with as it keeps increasing its value when pressed making it easier to spot while viewing the CanSniffer output.
Singling out Values with Filters:
If you would like to single out the throttle value then click the terminal window and press -000000 followed by the Enter key which will clear out all of the values scrolling. Then press +244 followed by the Enter key which will add back the throttle ID. You can now click the controller again and increase the speed with your Up arrow button without all the noise clouding your view. You will instead as shown below only have ID 244 in your output:

To get back all of the IDs again click the terminal window and input +000000 followed by the Enter key. Now you should see all of the output as before. Essentially 000000 means include everything. But when you put a minus in front of it then it negates everything and clears your terminal window filtering out all values.
Determine Blinker ID:
Now lets figure out another ID for the blinkers. If you hit the left or right arrow with the controls window selected you will notice a whole new ID appears in the list, ID 188 shown in the picture below which is associated with the blinker.

This ID was not listed before as it was not in use within the data output until you pressed the blinker control. Lets single this value out by pressing -000000 followed by +188. Just like in the throttle example your terminal should only show ID 188, initially it will show with 00 byte values.
As you press the left and the right blinker you will see the first Byte change from 00 to 01 or 02. If neither is pressed as in the screenshot above it will be 00. Its kind of hard to have the controller in focus and get a screenshot at the same time but the ID will remain visible as 00 until it times out and disappears from the list when not active. However with it filtered out as above you can get a better view of things and it wont disappear.
Time for YOU to do some Protocol Reversing:
This lab will give you a good idea how to reverse all of the functionality of the car and associate each action with the proper ID and BYTE. This way you can create a map of intended functionality changes you wish to make. Above we have done a few walk throughs with you on how to determine which byte and ID is associated with an action. Now its time to map everything out yourself with all the remaining functionality before moving on to attacking individual components.
Lab Work Suggestion:
- Take out a piece of paper and a pencil
- Try unlocking and locking doors and write down the ID which controls this action (remember your filters)
- Try unlocking each door and write down the BYTES needed for each door to open
- Try locking each doors and what Bytes change and what are their values, write them down
- Do the same thing for the blinkers left and right (Might be different then what I did above)
- What ID is the speedometer using? What byte changes the speed?
Attacking Functionality Directly:
With all of the functionality mapped out we can now try to target various devices in the network directly without interacting with the controllers GUI. Maybe we broke into the car via cellular OnStar connection or the center console units BLE connection which was connected to the CAN network in some way.
After an exploit we have direct access to the CAN network and we would like to perform actions. Or maybe you have installed a wireless device into an OBD2 port under the dashboard you have remote access to the automobile.
After an exploit we have direct access to the CAN network and we would like to perform actions. Or maybe you have installed a wireless device into an OBD2 port under the dashboard you have remote access to the automobile.
Using the data from the CAN network reversing lab above we can call these actions directly with the proper CAN-ID and Byte. Since we are remote to the target we can't just reach over and grab the steering wheel or hit the throttle we will instead send your CAN frame to make the change.
One way we can do this is via the CanSend utility. Lets take our information from our lab above and make the left turn signal flash with the following ID 188 for the turn signal by changing the first byte to 01 indicating the left signal is pressed. CanSend uses the format ID#Data. You will see this below when sending the turn signal via CanSend.
ficti0n@ubuntu:~/Desktop/ICSim$ cansend vcan0 188#01000000

You should have noticed that the left signal flashed. If not pay more attention and give it another try or make sure you used the correct ID and changed the correct byte. So lets do the same thing with the throttle and try to set the speed to something with ID 244 that we determined was the throttle.
ficti0n@ubuntu:~/Desktop/ICSim$ cansend vcan0 244#00000011F6
My guess is that nothing happened because its so fast the needle is not going to jump to that value. So instead lets try repeating this over and over again with a bash loop which simply says that while True keep sending the throttle value of 11 which equates to about 30mph:
ficti0n@ubuntu:~/Desktop/ICSim$ while true; do cansend vcan0 244#00000011F6; done

Yes thats much better, you may notice the needle jumping back and forth a bit. The reason the needle is bouncing back and forth is because the normal CAN traffic is sent telling the car its actually set to 00 in between your frames saying its 30mph. But it worked and you have now changed the speed the car sees and you have flashed the blinker without using the cars normal blinker controls. Pretty cool right?
Monitor the CAN Bus and react to it:
Another way to handle this issue is to monitor the CAN network and when it sees an ID sent it will automatically send the corresponding ID with a different value.. Lets give that a try to modify our speed output by monitoring for changes. Below we are simply running CanDump and parsing for ID 244 in the log output which is the throttle value that tells the car the speed. When a device in the car reports ID 244 and its value we will immediately resend our own value saying the speed is 30mph with the value 11. See below command and try this out.
ficti0n@ubuntu:~/Desktop/ICSim$ candump vcan0 | grep " 244 " | while read line; do cansend vcan0 244#00000011F6; done
With this running after a few seconds you will see the speed adjust to around 30MPH once it captures a legitimate CAN-ID 244 from the network traffic and sends its own value right after.
Ok cool, so now while the above command is still running click the controller window and start holding down the Up arrow with the controller in focus.. After a few seconds or so when the speed gets above 30MPH you will see the needle fighting for the real higher value and adjusting back to 30MPH as your command keeps sending its on value as a replacement to the real speed.
So thats one way of monitoring the network and reacting to what you see in a very crude manner. Maybe someone stole your car and you want to monitor for an open door and if they try to open the door it immediately locks them in.
Conclusion and whats next:
I am not an expert car hacker but I hope you enjoyed this. Thats about as far as I want to go into this subject today, in the next blog we will get into how to code python to perform actions on the CAN network to manipulate things in a similar way. With your own code you are not limited to the functionality of the tools you are provided and can do whatever you want. This is much more powerful then just using the CanUtils pre defined tools. Later on I will also get into the hardware side of things if you would like to try this on a real car where things are more complicated and things can go wrong.
More info
Saturday, April 25, 2020
Testing SAML Endpoints For XML Signature Wrapping Vulnerabilities
A lot can go wrong when validating SAML messages. When auditing SAML endpoints, it's important to look out for vulnerabilities in the signature validation logic. XML Signature Wrapping (XSW) against SAML is an attack where manipulated SAML message is submitted in an attempt to make the endpoint validate the signed parts of the message -- which were correctly validated -- while processing a different attacker-generated part of the message as a way to extract the authentication statements. Because the attacker can arbitrarily forge SAML assertions which are accepted as valid by the vulnerable endpoint, the impact can be severe. [1,2,3]
Testing for XSW vulnerabilities in SAML endpoints can be a tedious process, as the auditor needs to not only know the details of the various XSW techniques, but also must handle a multitude of repetitive copy-and-paste tasks and apply the appropriate encoding onto each message. The latest revision of the XSW-Attacker module in our BurpSuite extension EsPReSSo helps to make this testing process easier, and even comes with a semi-automated mode. Read on to learn more about the new release!
To simplify its use, the XSW-Attacker performs the attack in a two step process of initialization and execution, as reflected by its two tabs Init Attack and Execute Attack. The interface of the XSW-Attacker is depicted below.
The Init Attack tab displays the current SAML message. To execute a signature wrapping attack, a payload needs to be configured in a way that values of the originally signed message are replaced with values of the attacker's choice. To do this, enter the value of a text-node you wish to replace in the Current value text-field. Insert the replacement value in the text-field labeled New value and click the Add button. Multiple values can be provided; however, all of which must be child nodes of the signed element. Valid substitution pairs and the corresponding XPath selectors are displayed in the Modifications Table. To delete an entry from the table, select the entry and press `Del`, or use the right-click menu.
Next, click the Generate vectors button - this will prepare the payloads accordingly and brings the Execute Attack tab to the front of the screen.

At the top of the Execute Attack tab, select one of the pre-generated payloads. The structure of the selected vector is explained in a shorthand syntax in the text area below the selector.
The text-area labeled Attack vector is editable and can be used to manually fine-tune the chosen payload if necessary. The button Pretty print opens up a syntax-highlighted overview of the current vector.
To submit the manipulated SAML response, use Burp's Forward button (or Go, while in the Repeater).
First, open an intercepted request in Burp's Intruder (e.g., by pressing `Ctrl+i`). For the attack type, select Sniper. Open the Intruder's Positions tab, clear all payload positions but the value of the XML message (the `SAMLResponse` parameter, in our example). Note: the XSW-Attacker can only handle XML messages that contain exactly one XML Signature.
Next, switch to the Payloads tab and for the Payload Type, select Extension-generated. From the newly added Select generator drop-down menu, choose XSW Payloads, as depicted in the screenshot below.

While still in the Payloads tab, disable the URL-encoding checkbox in the Payload Encoding section, since Burp Intruder deals with the encoding automatically and should suffice for most cases.
Click the Start Attack button and a new window will pop up. This window is shown below and is similar to the XSW Attacker's Init Attack tab.

Configure the payload as explained in the section above. In addition, a schema analyzer can be selected and checkboxes at the bottom of the window allow the tester to choose a specific encoding. However, for most cases the detected presets should be correct.
Click the Start Attack button and the Intruder will start sending each of the pre-generated vectors to the configured endpoint. Note that this may result in a huge number of outgoing requests. To make it easier to recognize the successful Signature Wrapping attacks, it is recommended to use the Intruder's Grep-Match functionality. As an example, consider adding the replacement values from the Modifications Table as a Grep-Match rule in the Intruder's Options tab. By doing so, a successful attack vector will be marked with a checkmark in the results table, if the response includes any of the configure grep rules.
Our students Nurullah Erinola, Nils Engelberts and David Herring did a great job improving the execution of XSW and implementing a much better UI.
---
[1] On Breaking SAML - Be Whoever You Want to Be
[2] Your Software at My Service
[3] Security Analysis of XAdES Validation in the CEF Digital Signature Services (DSS)
[4] WS-Attacker
More informationTesting for XSW vulnerabilities in SAML endpoints can be a tedious process, as the auditor needs to not only know the details of the various XSW techniques, but also must handle a multitude of repetitive copy-and-paste tasks and apply the appropriate encoding onto each message. The latest revision of the XSW-Attacker module in our BurpSuite extension EsPReSSo helps to make this testing process easier, and even comes with a semi-automated mode. Read on to learn more about the new release!
SAML XSW-Attacker
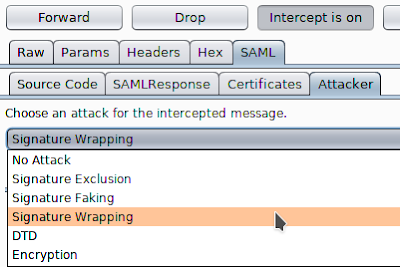
After a signed SAML message has been intercepted using the Burp Proxy and shown in EsPReSSO, you can open the XSW-Attacker by navigating to the SAML tab and then the Attacker tab. Select Signature Wrapping from the drop down menu, as shown in the screenshot below:
To simplify its use, the XSW-Attacker performs the attack in a two step process of initialization and execution, as reflected by its two tabs Init Attack and Execute Attack. The interface of the XSW-Attacker is depicted below.
 |
| XSW-Attacker overview |
The Init Attack tab displays the current SAML message. To execute a signature wrapping attack, a payload needs to be configured in a way that values of the originally signed message are replaced with values of the attacker's choice. To do this, enter the value of a text-node you wish to replace in the Current value text-field. Insert the replacement value in the text-field labeled New value and click the Add button. Multiple values can be provided; however, all of which must be child nodes of the signed element. Valid substitution pairs and the corresponding XPath selectors are displayed in the Modifications Table. To delete an entry from the table, select the entry and press `Del`, or use the right-click menu.
Next, click the Generate vectors button - this will prepare the payloads accordingly and brings the Execute Attack tab to the front of the screen.

At the top of the Execute Attack tab, select one of the pre-generated payloads. The structure of the selected vector is explained in a shorthand syntax in the text area below the selector.
The text-area labeled Attack vector is editable and can be used to manually fine-tune the chosen payload if necessary. The button Pretty print opens up a syntax-highlighted overview of the current vector.
To submit the manipulated SAML response, use Burp's Forward button (or Go, while in the Repeater).
Automating XSW-Attacker with Burp Intruder
Burp's Intruder tool allows the sending of automated requests with varying payloads to a test target and analyzes the responses. EsPReSSO now includes a Payload Generator called XSW Payloads to facilitate when testing the XML processing endpoints for XSW vulnerabilities. The following paragraphs explain how to use the automated XSW attacker with a SAML response.First, open an intercepted request in Burp's Intruder (e.g., by pressing `Ctrl+i`). For the attack type, select Sniper. Open the Intruder's Positions tab, clear all payload positions but the value of the XML message (the `SAMLResponse` parameter, in our example). Note: the XSW-Attacker can only handle XML messages that contain exactly one XML Signature.
Next, switch to the Payloads tab and for the Payload Type, select Extension-generated. From the newly added Select generator drop-down menu, choose XSW Payloads, as depicted in the screenshot below.

While still in the Payloads tab, disable the URL-encoding checkbox in the Payload Encoding section, since Burp Intruder deals with the encoding automatically and should suffice for most cases.
Click the Start Attack button and a new window will pop up. This window is shown below and is similar to the XSW Attacker's Init Attack tab.

Configure the payload as explained in the section above. In addition, a schema analyzer can be selected and checkboxes at the bottom of the window allow the tester to choose a specific encoding. However, for most cases the detected presets should be correct.
Click the Start Attack button and the Intruder will start sending each of the pre-generated vectors to the configured endpoint. Note that this may result in a huge number of outgoing requests. To make it easier to recognize the successful Signature Wrapping attacks, it is recommended to use the Intruder's Grep-Match functionality. As an example, consider adding the replacement values from the Modifications Table as a Grep-Match rule in the Intruder's Options tab. By doing so, a successful attack vector will be marked with a checkmark in the results table, if the response includes any of the configure grep rules.
Credits
EsPReSSO's XSW Attacker is based on the WS-Attacker [4] library by Christian Mainka and the original adoption for EsPReSSO has been implemented by Tim Günther.Our students Nurullah Erinola, Nils Engelberts and David Herring did a great job improving the execution of XSW and implementing a much better UI.
---
[1] On Breaking SAML - Be Whoever You Want to Be
[2] Your Software at My Service
[3] Security Analysis of XAdES Validation in the CEF Digital Signature Services (DSS)
[4] WS-Attacker
Ethical Hackers Platform: How To Install A bWAPP In Windows 2018

bWAPP, or a buggy web application, is a free and open source deliberately insecure web application. It helps security enthusiasts, developers and students to discover and to prevent web vulnerabilities. bWAPP prepares one to conduct successful penetration testing and ethical hacking projects.
What makes bWAPP so unique? Well, it has over 100 web vulnerabilities!
It covers all major known web bugs, including all risks from the OWASP Top 10 project. bWAPP is for web application security-testing and educational purposes only.
Have fun with this free and open source project!
bWAPP is a PHP application that uses a MySQL database. It can be hosted on Linux/Windows with Apache/IIS and MySQL. It can also be installed with WAMP or XAMPP. Another possibility is to download the bee-box, a custom Linux VM pre-installed with bWAPP.
First of all you have need to install a local server over system that may be XAMPP, WAMP or LAMP. These servers are totally free of cost you can freely download from the internet. Mostly XAMPP is used because it has more functionalities than others on the other hand WAMP is also a simple platform for PHP while, LAMP is used over the Linux distributions. After downloading any one of them you have need to install that first after that you'll be able to configure bWAPP over your system.
Why we use the software application for configuring this bWAPP? As we know PHP is a server side language and there must be a server to read the PHP script. Without using any server we can't do programming with PHP. If you have a little piece of code of PHP you must install a server in your system for running that PHP script.
Ethical Hackers Platform: How to Install a bWAPP In Windows 2018. Free source for exploring things related to an Ethical Hacking.
Related links
Thursday, April 23, 2020
WHY WE DO HACKING?
Purpose of Hacking?
. Just for fun
.Show-off
.Steal important information
.Damaging the system
.Hampering Privacy
.Money Extortion
.System Security Testing
.To break policy compliance etc

. Just for fun
.Show-off
.Steal important information
.Damaging the system
.Hampering Privacy
.Money Extortion
.System Security Testing
.To break policy compliance etc

Related articles
Raspberry Pi Zero Para "Makers": 6 PoCs & Hacks Just For Fun (1 De 3)
Desde hace ya unas semanas, desde que se declaró el estado de alarma, millones de ciudadanos de todo el mundo nos encontramos en un periodo de confinamiento por culpa del ya famoso COVID-19. Esta situación excepcional nos ha permitido pasar más tiempo con algunos de nuestros familiares más cercanos y comenzar o retomar algunos de los proyectos que teníamos olvidados por casa.
Si este es tu caso y estás buscando alguna idea interesante con la que entretenerte en esta cuarentena has llegado al sitio correcto. En esta serie de tres artículos os presentaremos a vosotros los "Makers" o los que queréis ser "Makers" alguna vez, seis interesantes proyectos basados en la Raspberry Pi Zero y os explicaremos cómo llevarlos a cabo.
Este articulo está hecho al más puro ejemplo del libro de 0xWord para "Makers" que hace lo mismo: Arduino para Hackers: PoCs & Hacks Just for Fun (del que además tenéis un VBOOK con sesiones en vídeo de los hacks). Además, os dejo aquí otras referencias de otros hacks hechos con Raspberry Pi y que han sido publicados en este blog.
- Raspberry Pi: Cómo construir un medidor ambiental
- Raspberry Pi: Dirtytooth para Raspberry Pi v2.0
- Raspberry Pi: Una VPN para navegar por redes WiFi con portales cautivos
- Raspberry Pi: Pi Guardian con Latch, Bots en Telegram y "ojos"
- Raspberry Pi: Latch My Carç
- Rapsberry Pi: Tu servicio VPN con OpenVPN, Latch y Virus Total
- Raspberry Pi: Latch en OpenWRT
Y ahora, vamos a por los seis proyectos que puedes hacer tú en tu casa para entretenerte y meterte en el mundo de los "makers" de una vez por todas si tenías ganas de ello.
1.- Pi Zero Drone: Drone "Low-Cost" con Raspberry Pi Zero
El primero de los proyectos de los que os hablaremos hoy se trata de la construcción de un Drone Low-Cost - por menos de 200 € - el cual se basará en una distribución de GNU/Linux y utilizara la Raspberry Pi 0 como placa controladora o cerebro. El mundo de los drones y cuadrocopteros ligeros cuenta con millones de aficionados, con Pi Zero Drone es posible acercar un poco más este mundillo a todos aquellos que quieren introducirse en la construcción de estos divertidos aparatos.
Las piezas necesarias serán las siguientes: chasis, variadores, motores, hélices, batería, controladora PFX mini (69 €) y por supuesto una Raspberry Pi Zero. Lo primero será realizar el montaje del drone, este proceso es bastante sencillo y no debería llevarte más de 1 hora. Comenzaremos con el montaje de la estructura, en cada brazo del chasis hay que fijar un motor sujetándolo con tornillos (vienen con kit del chasis), a continuación se deben conectar los variadores a los motores (utilizando los cables de colores) y fijarlos en la zona central de los brazos.
Para terminar hay que situar la Raspberry Pi Zero y la controladora PFX mini en el centro del chasis, conectando ambas entre sí utilizando los pines y separadores de teflón que vienen en el kit de la controladora. Por último solo queda conectar el módulo de la batería y fíjalo a la parte inferior del chasis utilizando los velcros que te vienen con el kit. También hay que colocar una hélice en cada motor.
Una vez tengamos el montaje realizado pasaremos a la parte de configuración del autopilot (PFX mini + Raspberry Pi Zero), lo bueno del kit de Erle Robotics es que incluye acceso a sus imágenes Debian compatibles con la PFX mini, así que solo tendrás que guardarlas en una tarjeta micro SD e introducirla en tu Raspberry Pi Zero.
Por ultimo conectaremos el cable JST GH del módulo de alimentación a nuestro montaje de autopilot, lo que hará que al conectar la batería se encienda el drone. Ya solo nos queda conectar los variadores de cada brazo con su respectivo pin a la PFX mini (PWM1 con ESC1, PWM2 con ESC2 y sucesivamente) ya que dos de los motores giraran en sentido horario y otros dos en anti horario.
Figura 7: Cosntrucción de Pi Zero Drone paso a paso
Con el drone ya construido y listo para volar solo queda decidir qué dispositivo utilizar para controlarlo. En este caso el método más sencillo es utilizar una emisora de radio control convencional que cuente con un receptor (el cual montaremos en el drone). Tienes en la página web toda la información detallada del proyecto Pi Zero Drone con un paso a paso.
2.- Zero Phone: construcción de un Smartphone con Raspberry Pi Zero
El segundo de los proyectos del que os hablaremos hoy es la construcción de un mini teléfono móvil, sin duda un proyecto bastante interesante. En este caso la idea surgió de un proyecto de crowdfounding y sus creadores aseguran que es posible construir el smartphone por menos de 50 €.
Este proyecto ha recibido el nombre de Zerophone, es Open Source y está basado en una distribución de GNU/Linux. Una de las mayores ventajas de construir el teléfono nosotros mismos es que nunca tendremos problemas de portabilidad o incompatibilidad con la tarjeta SIM de cualquier operadora de telecomunicaciones. Aunque el Zerophone sea un dispositivo de aspecto muy sencillo será capaz de ejecutar numerosas aplicaciones - solo GNU/Linux pone los limites -, además contará con acceso root.
En cuanto a su hardware, al basarse en una Raspberry Pi Zero este es fácil de modificar y reparar.Una vez hayas adquirido tu kit Zerophone o hayas recopilado todos los componentes necesarios solo tendrás que descargar el software gratuito y seguir paso a paso las instrucciones que encontrarás en la página web del proyecto.
Si nos fijamos en sus especificaciones se podría decir que es un Smartphone bastante completo, además de contar con iluminación RGB y vibración dispone de una entrada micro HDMI, un puerto USB (de tamaño completo) y un jack de 3.5 en el que podemos conectar auriculares. También cuenta con conectividad Wi-Fi, 2G y es posible implementar BlueTooth.
En cuanto a la pantalla y teclado cuenta con una pantalla de 1,3 pulgadas y un teclado similar al de los teléfonos móviles de la década anterior. Si esta configuración no te resulta cómoda también es posible sustituir la pantalla y el teclado por una pantalla táctil de Raspberry Pi Zero. Tienes un buen análisis hecho por Javier Pastor en el blog de Xakata.
Una de las cosas que hacen bastante atractivo este proyecto es la posibilidad de conectar el dispositivo a un monitor y de utilizar teclado y ratón para controlarlo o modificar sus funciones desde su API. Si modificar el software del dispositivo no te parece suficiente también puedes personalizar por completo el hardware, es posible integrar una cámara hasta de 8 megapíxeles, nuevos botones o sensores analógicos o digitales, se puede añadir una batería más duradera, añadir distintos módulos (GPS, radio,…) o recurrir a la impresión 3D para diseñar una carcasa totalmente personalizada.
Figura 11: Puedes tener TOR en tu ZeroPhone y navegar por la Deep Web
Zerophone es una plataforma ideal para la realización de diversos proyectos, es posible utilizar cualquier lenguaje de programación en él y además permite la ejecución de APIs, scripts SSH y de consolas UART, e incluso, como se ve en la Figura 11, navegar por TOR.
Como veis son proyectos que requieren cierta maña, pero no me digáis que en lugar de estar haciendo puzzles de 1.000 piezas no es mejor estar convirtiéndote en un "maker" y jugando con el hardware y el software.
Autor: Sergio Sancho Azcoitia
***********************************************************************************
- Raspberry Pi Zero para "Makers": 6 PoCs & Hacks Just for Fun (1 de 3)
- Raspberry Pi Zero para "Makers": 6 PoCs & Hacks Just for Fun (1 de 3)
- Raspberry Pi Zero para "Makers": 6 PoCs & Hacks Just for Fun (1 de 3)
***********************************************************************************
 |
| Figura 1: Raspberry Pi Zero para "Makers": 6 PoCs & Hacks Just for Fun (1 de 3) |
Si este es tu caso y estás buscando alguna idea interesante con la que entretenerte en esta cuarentena has llegado al sitio correcto. En esta serie de tres artículos os presentaremos a vosotros los "Makers" o los que queréis ser "Makers" alguna vez, seis interesantes proyectos basados en la Raspberry Pi Zero y os explicaremos cómo llevarlos a cabo.
 |
| Figura 2: Arduino para Hackers: PoCs & Hacks Just for fun en 0xWord de Álvaro Núñez-Romero |
Este articulo está hecho al más puro ejemplo del libro de 0xWord para "Makers" que hace lo mismo: Arduino para Hackers: PoCs & Hacks Just for Fun (del que además tenéis un VBOOK con sesiones en vídeo de los hacks). Además, os dejo aquí otras referencias de otros hacks hechos con Raspberry Pi y que han sido publicados en este blog.
- Raspberry Pi: Cómo construir un medidor ambiental
- Raspberry Pi: Dirtytooth para Raspberry Pi v2.0
- Raspberry Pi: Una VPN para navegar por redes WiFi con portales cautivos
- Raspberry Pi: Pi Guardian con Latch, Bots en Telegram y "ojos"
- Raspberry Pi: Latch My Carç
- Rapsberry Pi: Tu servicio VPN con OpenVPN, Latch y Virus Total
- Raspberry Pi: Latch en OpenWRT
Y ahora, vamos a por los seis proyectos que puedes hacer tú en tu casa para entretenerte y meterte en el mundo de los "makers" de una vez por todas si tenías ganas de ello.
1.- Pi Zero Drone: Drone "Low-Cost" con Raspberry Pi Zero
El primero de los proyectos de los que os hablaremos hoy se trata de la construcción de un Drone Low-Cost - por menos de 200 € - el cual se basará en una distribución de GNU/Linux y utilizara la Raspberry Pi 0 como placa controladora o cerebro. El mundo de los drones y cuadrocopteros ligeros cuenta con millones de aficionados, con Pi Zero Drone es posible acercar un poco más este mundillo a todos aquellos que quieren introducirse en la construcción de estos divertidos aparatos.
 |
| Figura 3: Pi0Drone un drone por 200 USD |
Si no estás familiarizado con la construcción de drones de carreras o de cualquier otro tipo no tienes de que preocuparte, a continuación te explicaremos cuales son las piezas necesarias para este montaje y como se ensamblan pero si te gusta el mundo de los Drones, y tienes inclinaciones de "maker", puedes leer el libro de David Meléndez Calero que habla justo de estas cosas: "Hacking con Drones: Love is in the air".
 |
| Figura 4: Hacking con Drones: "Love is in the air" |
Las piezas necesarias serán las siguientes: chasis, variadores, motores, hélices, batería, controladora PFX mini (69 €) y por supuesto una Raspberry Pi Zero. Lo primero será realizar el montaje del drone, este proceso es bastante sencillo y no debería llevarte más de 1 hora. Comenzaremos con el montaje de la estructura, en cada brazo del chasis hay que fijar un motor sujetándolo con tornillos (vienen con kit del chasis), a continuación se deben conectar los variadores a los motores (utilizando los cables de colores) y fijarlos en la zona central de los brazos.
 |
| Figura 5: Kit de Pi Zero Drone |
Para terminar hay que situar la Raspberry Pi Zero y la controladora PFX mini en el centro del chasis, conectando ambas entre sí utilizando los pines y separadores de teflón que vienen en el kit de la controladora. Por último solo queda conectar el módulo de la batería y fíjalo a la parte inferior del chasis utilizando los velcros que te vienen con el kit. También hay que colocar una hélice en cada motor.
 |
| Figura 6: Pi Zero Drone montado |
Una vez tengamos el montaje realizado pasaremos a la parte de configuración del autopilot (PFX mini + Raspberry Pi Zero), lo bueno del kit de Erle Robotics es que incluye acceso a sus imágenes Debian compatibles con la PFX mini, así que solo tendrás que guardarlas en una tarjeta micro SD e introducirla en tu Raspberry Pi Zero.
Por ultimo conectaremos el cable JST GH del módulo de alimentación a nuestro montaje de autopilot, lo que hará que al conectar la batería se encienda el drone. Ya solo nos queda conectar los variadores de cada brazo con su respectivo pin a la PFX mini (PWM1 con ESC1, PWM2 con ESC2 y sucesivamente) ya que dos de los motores giraran en sentido horario y otros dos en anti horario.
Figura 7: Cosntrucción de Pi Zero Drone paso a paso
Con el drone ya construido y listo para volar solo queda decidir qué dispositivo utilizar para controlarlo. En este caso el método más sencillo es utilizar una emisora de radio control convencional que cuente con un receptor (el cual montaremos en el drone). Tienes en la página web toda la información detallada del proyecto Pi Zero Drone con un paso a paso.
2.- Zero Phone: construcción de un Smartphone con Raspberry Pi Zero
El segundo de los proyectos del que os hablaremos hoy es la construcción de un mini teléfono móvil, sin duda un proyecto bastante interesante. En este caso la idea surgió de un proyecto de crowdfounding y sus creadores aseguran que es posible construir el smartphone por menos de 50 €.
 |
| Figura 8: Web del proyecto ZeroPhone |
Este proyecto ha recibido el nombre de Zerophone, es Open Source y está basado en una distribución de GNU/Linux. Una de las mayores ventajas de construir el teléfono nosotros mismos es que nunca tendremos problemas de portabilidad o incompatibilidad con la tarjeta SIM de cualquier operadora de telecomunicaciones. Aunque el Zerophone sea un dispositivo de aspecto muy sencillo será capaz de ejecutar numerosas aplicaciones - solo GNU/Linux pone los limites -, además contará con acceso root.
En cuanto a su hardware, al basarse en una Raspberry Pi Zero este es fácil de modificar y reparar.Una vez hayas adquirido tu kit Zerophone o hayas recopilado todos los componentes necesarios solo tendrás que descargar el software gratuito y seguir paso a paso las instrucciones que encontrarás en la página web del proyecto.
 |
| Figura 9: Aspecto de Zero Phone |
Si nos fijamos en sus especificaciones se podría decir que es un Smartphone bastante completo, además de contar con iluminación RGB y vibración dispone de una entrada micro HDMI, un puerto USB (de tamaño completo) y un jack de 3.5 en el que podemos conectar auriculares. También cuenta con conectividad Wi-Fi, 2G y es posible implementar BlueTooth.
 |
| Figura 10: ZeroPhone kit |
En cuanto a la pantalla y teclado cuenta con una pantalla de 1,3 pulgadas y un teclado similar al de los teléfonos móviles de la década anterior. Si esta configuración no te resulta cómoda también es posible sustituir la pantalla y el teclado por una pantalla táctil de Raspberry Pi Zero. Tienes un buen análisis hecho por Javier Pastor en el blog de Xakata.
Una de las cosas que hacen bastante atractivo este proyecto es la posibilidad de conectar el dispositivo a un monitor y de utilizar teclado y ratón para controlarlo o modificar sus funciones desde su API. Si modificar el software del dispositivo no te parece suficiente también puedes personalizar por completo el hardware, es posible integrar una cámara hasta de 8 megapíxeles, nuevos botones o sensores analógicos o digitales, se puede añadir una batería más duradera, añadir distintos módulos (GPS, radio,…) o recurrir a la impresión 3D para diseñar una carcasa totalmente personalizada.
Figura 11: Puedes tener TOR en tu ZeroPhone y navegar por la Deep Web
Zerophone es una plataforma ideal para la realización de diversos proyectos, es posible utilizar cualquier lenguaje de programación en él y además permite la ejecución de APIs, scripts SSH y de consolas UART, e incluso, como se ve en la Figura 11, navegar por TOR.
Como veis son proyectos que requieren cierta maña, pero no me digáis que en lugar de estar haciendo puzzles de 1.000 piezas no es mejor estar convirtiéndote en un "maker" y jugando con el hardware y el software.
Autor: Sergio Sancho Azcoitia
***********************************************************************************
- Raspberry Pi Zero para "Makers": 6 PoCs & Hacks Just for Fun (1 de 3)
- Raspberry Pi Zero para "Makers": 6 PoCs & Hacks Just for Fun (1 de 3)
- Raspberry Pi Zero para "Makers": 6 PoCs & Hacks Just for Fun (1 de 3)
***********************************************************************************


Related word
Wednesday, April 22, 2020
15 Important Run Commands Every Windows User Should Know
There are several ways to efficiently access the files, folders, and programs in Windows operating system. We can create shortcuts, pin programs to the taskbar, Start menu shortcuts etc. but we can't do it for all programs in many cases. However, the Windows Run Command box is one of the most efficient ways of accessing system programs, folders, and settings.

In this article, I am going to share 15 most important Run commands for Windows users. These commands can make it easier to manage a lot of tasks.
How to open Windows Run command box?
You need to press Win+R (Hold Windows button then Press R)
Important Run Commands Every Windows User Should Know
1. %temp%
This is the fastest way to clear the temporary files from your computer. It can save a lot of space which was being wasted by temporary files.
2. cmd
This command will open the windows DOS command prompt. Windows command prompt is very useful for performing many tasks which are not possible using graphical user interface.
3. MSConfig
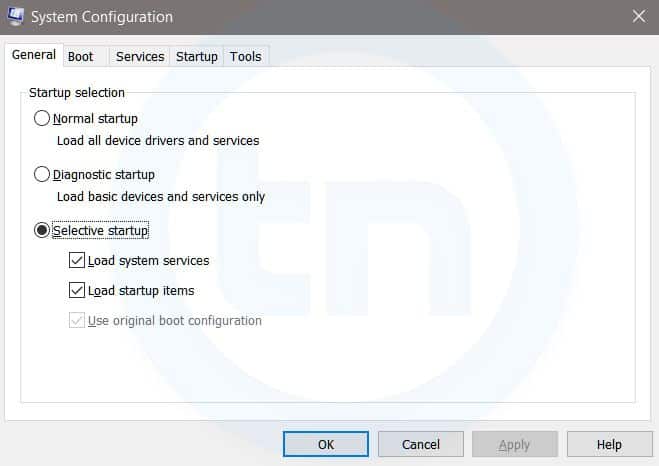
Windows System Configuration
This command will open Windows System Configuration where you can edit different things like the boot options, startup options, services, etc.
4. sysdm.cpl
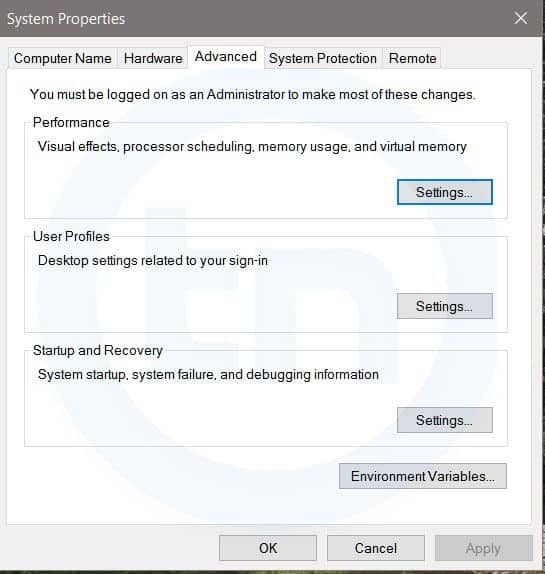
System Properties window
This command will open the System Properties window, Where you can change the system protection and performance related many settings
5. Powershell
Powershell is very similar the command prompt. Just type this command in the Run dialog box, and you will have your PowerShell opened without administrator privileges.
6. perfmon.msc

Windows System Performance monitor
This command can be used to monitor the performance of your computer. There are plenty of options for monitoring the system performance
7. regedit
Regedit Run command is used to open the Windows Registry. It is a hierarchical database that hosts all the configurations and settings of Windows operating system, it's users and the installed software.
8. \ (Backslash)
This is one of the lesser known Run commands. Just enter the backslash into the Run dialog box and it will open up the C drive. It is one of the quickest ways to access the C drive.
9. . (Dot)
This is yet another lesser known Run command. When executed, it opens the current user's home folder which hosts all the other local folders like the Downloads, Documents, Desktop, Pictures, etc.
10. .. (Double Dots)
When you execute these two dots in the Run dialog box, it will open up the Users folder which is located directly on the C drive
Also Read; Top 10 Great Gifts For Hackers
11. Control
This command will open the control panel. Control panel is used for managing all the system settings and programs
12. hdwwiz.cpl
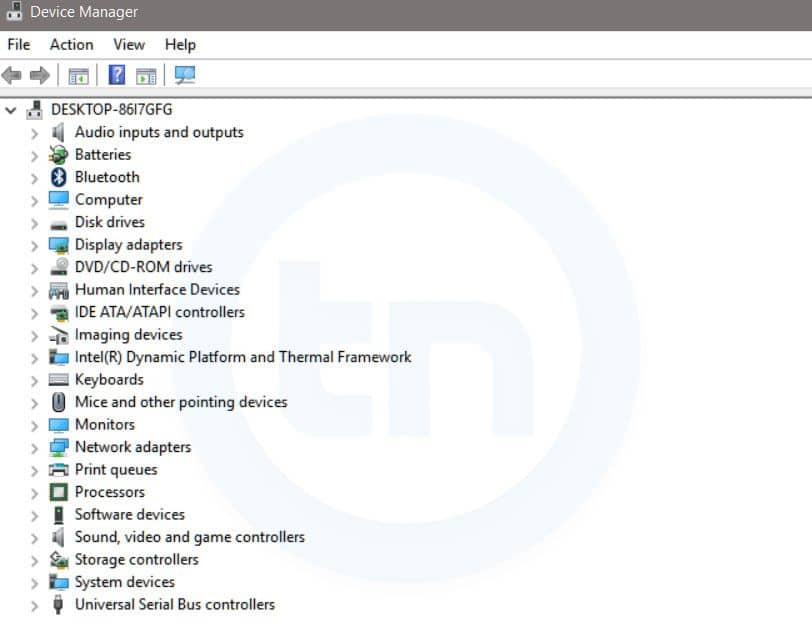
Windows Device Manager
This command is used to open the Device Manager in Windows. You can manage all the device connected internally or externally to your PC.
13. Notepad
The quickest way to open notepad in Windows. Just type this command in Run Box and hit enter.
14. osk
This command will open On-Screen Keyboard on your display monitor. You can easily touch and type or use your mouse for typing.
15. taskmgr
This command will open task manager where you can manage all the processes and programs running on Windows Operating system.
Continue reading
Subscribe to:
Comments (Atom)